If you are in the world of trying to figure out the best way to save energy, you have likely been making that great transition into the world of using solar energy. That being said, solar cooking has become a way of life for many people who are trying to conserve energy and help the environment at the same time. But, what is solar cooking like? How can you put together your own solar cooker? How does the whole process work? We’re going to explore those questions and more throughout the entirety of this article.
Solar panel cooking can be fun and easy, and it’s great for the environment. No longer would you have to deal with gas-powered stoves or electrical ovens and all the hazards that come with them. Instead, this article will show you how to construct and use your very own solar panel cooker from everyday materials.
How Does Solar Cooker Work?
As you may expect from the name, solar cooking is, in fact, a way to use the sun in order to cook your food. This is instead of a grill, stove, or oven. That being said, there are a few main principles that come into play when you’re looking at solar cooking.
Your solar panel cooker needs to stay outside where it can absorb the thermal energy from the sun’s rays. It won’t work after dark or when clouds are obscuring the sun from your solar cooker. High winds can be a problem as well, as they can blow your food about.
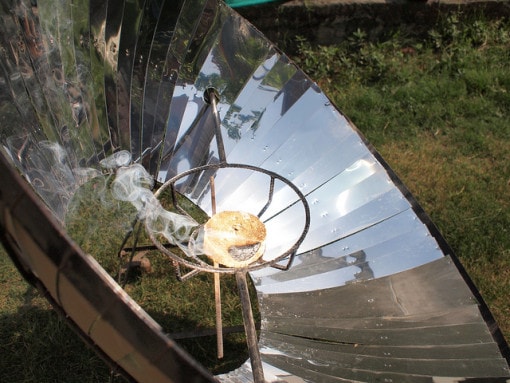
The solar cooker transfers sunlight into thermal energy, radiating heat along the aluminum foil insides of your panels. The solar cooker should sit in direct sunlight for several hours before it will be ready for use. But when it is, be careful, as it will be very hot- hot enough to cook food, hopefully. Treat the solar cooker like a grill, handling the food on it with a spatula or long fork. You should also wear protective gear like an oven mitt on your hands to shield yourself from the heat.
To get the most out of your solar cooker, it is a good idea to cover it with a sheet of foil or some other metal covering. This traps the heat inside and warms food even faster. It also keeps food juicer and tastier so no fluids and aromas are evaporating or escaping through the top opening.
When you are not using your solar cooker, it should be stored out of the sunlight and away from liquids that could damage the cardboard frame.
- Fueling with sunshine. The sun is at the center of solar energy, of course, so that is going to be your main source of fuel, rather than other forms of fuel like gas, oil, and wind. By harnessing the power of the sun, you’re going to see a lot of results when it comes to cooking outside.
- How does sunlight turn into heat? This is the big question at the center of solar cooking. How are you going to take the energy from the sun and turn it into something that is actually going to be able to cook the food that you’re making? The oven that you use is going to make a big difference for you here.
- How do you maintain the amount of heat in the solar oven? Lastly, in order to cook, you need to be able to have a constant source of heat that will maintain the amount of heat needed to cook the food thoroughly. What will you do in order to ensure that this will work out? You’ll have to do deal with this issue when you’re putting the design together.
How Do I Build a Lightweight Solar Cooker
First, you’ll need some materials, and the required ones are common enough: One medium-size cardboard box, a roll of aluminum foil and glue. You can get both of these at the grocery store, as grocers are always tossing out the cardboard boxes that their stock comes in.
Cut off two opposing sides of the box and be sure to include the panels at the top of the box into your piece. Make sure you don’t cut adjacent sides of the box, as these two pieces should be the same size. When you are finished, you should have two flat pieces with flaps on top, and both pieces should be exactly the same size.
On both pieces draw ray lines on the large portion of each panel. Start at a corner next to the flap and draw the lines outward toward the opposite edge of the same rectangle. There should be about five ray lines on each large portion of your pieces. These ray lines will be fold pieces, but we’re not ready to fold them just yet.
Next, make a cut from the origin of the ray lines along the base of the flap, but only cut halfway up the flap
Putting the Panels Together
Now fold on all of the fold lines you made, then glue aluminum foil on the inside rectangles. A single layer should suffice. Now you are ready to assemble your two pieces. Fit them together in two “L” shapes where the large, folded rectangle portions are opposite each other and the small flaps join with each other.
Now it is time to make your pieces join securely and give them support so the solar cooker can stand up on its own. Cut a small piece of cardboard from your original box and place it at the bottom corner of the panels, where the two pieces meet. Glue this piece to the base of the bottom panel, then make two small, pencil-sized holes in the upper flap of your small joining piece. Run a string through these holes and tie it securely when you have the panels adjusted how you want them.
You should now have a working solar cooker that looks like a splayed funnel with only one opening.
How Do I Build a Heavy Duty Solar Cooker?
Alright, so now that we have an idea of how the solar cooker is going to have to work, we’re going to share an easy way to actually put a solar cooker together.
- Get a large metal drum or another large metal object that you can use for the base of the solar cooker that you are putting together.
- Cut the drum in half, removing the top so that it looks like you have made some sort of trough-like farm animals would eat out of. Discard the other half unless you’re considering making two of these.
- Clean out the entire part of the drum that you are using in order to get every last bit of junk out there. Degreasing soap will help to get rid of everything that had previously been stored inside of the drum.
- Take three different pieces of sheet metal that you can use to sit on the inside of the grill area that you have made. Measure the sheets out so that they fit on the ends and the bottom of the grill itself. They should be about the same size as the part that you took away.
- Use a corded power drill to screw the sheet metal into the inside of the drum that you’ve already put together. There are a few ways that you can put it together; just figure out the system that is going to be best for you and your needs (beware – some of the screws may stick out depending on the system that you use).
- When you are done attaching the sheet metal, take a paint that was meant for the inside of grills and use it for your oven. This paint reflects the sun well and will make sure that you get the most heat that you possibly can get.
- Take the area around the outside top of the drum and make a “lip” that the glass top will be able to sit in comfortably. Make sure that one of the sides does not have a lip so that you can slide the glass inside and out.
- When everything has dried and is not moving, flip over the grill that you’ve put together and cover the entire bottom with insulation that sprays on. A little goes a long way with this insulation, so keep that in mind when you’re spraying it on; start thin, and then add more if you deem it necessary to do so.
- After the insulation has settled in and dried, it’s time to attach the base on while the unit is still upside down.
- Note: the base can be almost anything that you want it to be. Just make sure that it’s large enough to keep the grill upright and easy to move around if you decide you need to do so.
- After the base is on firmly, take the time to drill some small holes in the bottom of the oven area. The importance of these is to make sure that liquids can go through and drip to the ground when you’re cooking. For best results, put them in a straight line and a few inches apart from one another.
- Now, it’s time to flip the solar cooker back over. Do so carefully and, at this point, make sure that you don’t have any issues with the way that you’ve structured your solar cooker. Look for stability and ensure that it’s not going to fall apart.
- Put a thermometer on the inside of the cooking unit. This will help you to keep an eye on the temperature and ensure that the food is cooking as it should be. Magnetic thermometers are relatively inexpensive and are great for this task.
- Take a rectangular grill and put it along the bottom, if you wish to do so. This will assist you when it comes time for you to start cooking. It allows for easy placement of your food and gives you an area that you can clean when you’re done the cooking.
- Now it’s time for you to do a fully comprehensive test of your oven. On a sunny day, put the glass on top of the oven and let it sit for an extended period of time, going outside and looking through the glass at the magnetic thermometer inside every 15 minutes or so.
This will give you an idea of how hot it can get – you want it to maintain between 250 and 350 for an extended period of time in order to be able to use it effectively.
Instead of using a standard oven, maybe it’s time for you to think about and consider getting into the whole prospect of solar cooking. Look into the process for yourself, give it a try and see how much of a difference that it can make for you and your efforts toward helping the environment and the world around you to thrive. If you haven’t tried it out yet, why not? It could make a huge difference for you and your family.


